Monday, December 27, 2010
Monday, December 20, 2010
The Gift
I finished making x-mas gift for my friend today. I wish I could make more and send to as many friends as I could. Though I don't celebrate x-mas, but it's always a pleasure to make x-mas gift for my friends. Well, I usually send cards but this time I decided I'll make a proper handmade x-mas gifts so this particular friend of mine can celebrate x-mas properly ^_*
I made X-mas tree decorations (I hope she buys one already) or otherwise she can hang them on her wall..
She loves Korean/Japanese craft, so I thought these simple embroideries will delight her....if I can be a bit narcissistic here, I love the Santa plush. It's really cute.
I used chain stitch and buttonhole stitch for the 'belt'. The only drawback was I didn't have x-mas green embroidery floss and I didn't get the time to go to the shop & get one...
Anyway, I hope she likes them...and I hope they can cheer her up a bit...:D
The Santa Embroidery is now available in PDF in my SCRIBD.
The Santa Embroidery is now available in PDF in my SCRIBD.
Merry Christmas & Joyful New Year everyone....
Monday, December 13, 2010
DIY Labels
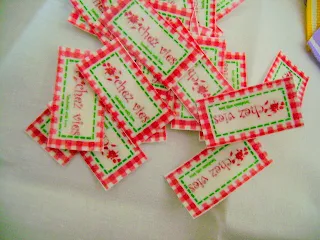
I got this Iron-on Transfer paper which I always wanted to have from my BIL in Indonesia. I've been wanting to try the fabric label like I saw in Patchwork Pottery's Tutorial few months back. Finally, yesterday I got the chance to try it after my DH bought me a canon pixma ink jet printer...Thank you so much, dear..:). The printer worked wonderfully. In fact, I tried both using my friend, Agnes' design and I tried the plain letter one.
I love the colored ones (though I should have made it bigger). It turned out very clear and I iron it on a plain cotton fabric and know what..after I cut it, the fabric don't fray...yay!!!..
Second one, I used the plain letters "chez vies" and I iron it on grosgrain ribbon. The mistake I made here is I cut the strips too narrow. Well the letter perfectly fit in the middle part of the ribbon but I should have cut it about 1' wide. Lesson learnt!
Another lesson I learn is that while ironing, DO NOT move your iron (like when you're ironing). Just press it firmly on the design. Otherwise it will smudge.
Now let's get down making something and start using those labels...:)
Happy Crafting
Saturday, December 11, 2010
Trial from Wee Wonderfuls
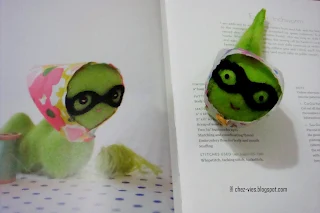
Just a quick post of few things I have done recently. In my previous post I told you about the Wee Wonderfuls book that I recently bought. My son happened to see it and immediately wanted me to make the inchworm. When I showed my son, he was very happy and said 'Thank you mama, you're great'..I was like 'wow'!! hehehehhee
I didn't have black button for the eyes, as a replacement I used 'bindi' (a small dot worn on the forehead by women in India). It's a 'stick-on' type of bindi and made of felt ^_^....
Here it is..the image from the book and the one that I made. The book is very useful with clear step by step photos, clear written instructions and ready to use patterns. This is what I like best...I mean, I hate to resize patterns!!
So there she is again.....
Now, I'm setting out to make few more for my younger son and my dear friend
Happy Crafting
Thursday, December 9, 2010
The Sky
I love watching the sky from my porch. Especially during the monsoon season and at sun set. The sky sometimes bright blue and suddenly black cloud appear as if ready to grab you. These photos I took in August 2010. More photos are in my FLICKR
This is the West View. I can see the sun flickr behind the dark cloud like a promise of good day.
This is the South View...where the sky is still blue and scattered white clouds. The birds are rushing home.
Happy Crafting ^_^
Wednesday, December 8, 2010
Chai Time
I love sipping a steaming hot chai in the cold winter afternoon. With my fave Indian sweets. This is what I have today: A cup of Indian Chai, Dil Kush (happy heart) sweet and Fruit Cake..yummm...
Today is one of those gloomy days when the sun just refused to shine. But that didn't dither my boy from riding his cycle. While watching him, I'm doing some hand-sewing work which is progressing very SLOW...:(. Gotta finish those quickly...
oh and I want to show you my newest books. There is this fab online store here in India which selling all books (Indian or Foreign) at a very reasonable price - FLIPKART - and free shipping too. I've been several time buying books from them but this is the first time I bought foreign publication books. I always wanted to buy that ONE WONDER YARDS....though most of the stuff is available online but you know I still love flipping through books or magazines instead of staring at my laptop :D. And the second one is is WEE WONDERFULS....don't they make cutest dolls??? Will definitely try making them. Plus 2 books on SUNBONNET SUE ...they are simply wonderful!!!...
And one FELT CRAFT book from Indonesian crafter which I bought from Indonesia (I wrote about it in my Prev. Post)
I still have few books in my list ^_^
Happy Crafting
Last month I bought this cotton interface. It's fabric-y type and it's the one used to interface man's coat.
We don't have fancy craft supply store here. My supply store is referred by everyone as 'butam dukan' or button shop. The shop keeps everything you need for crafting, ONLY you have to know the INDIAN terms for it ^_^. Such as Bakram for Interface, Pasting for fusible interface, huta for thread, etc.
Today finally I got time to try using it...and I LOVE it. It gives a soft yet sturdy finish to the pouch. And cushy too...and most of all, it's easy on my sewing machine n easy to turn the fabric.
Outer Fabric is Indian Block Print Cotton and the inner fabric is white with blue polkadots (will upload the inner photo later :-D )
what do you think?
If you need the similar fabric it's available at INDYACRAFTS.
Thanks for dropping by & Happy Crafting ^_^
Tuesday, December 7, 2010
OOAK Pillow Covers
I have this pin-tuck cotton fabric for sometimes and always wondering what will I do with it. Now it turned out to be a very pretty pillow covers. The fabric is just enough for 2 simple pillows with envelope style closure. No Zipper no Velcro :). What do you think?
Happy Crafting
Sunday, December 5, 2010
From The Holiday
I came back from Indonesia over a month back and I got some exciting experience this time.
#1. I met an Indonesian Crafter, Dini. She lives in my hometown in Malang - East Java. It was through FB that we became familiar with each other. So, one day she told me she'd come and visit me. I was all excited.
She gave me her lovely crocheted bookmarks. They are so beautiful that I don't think I will be able to use it without spoiling it. Thanks a lot Dini...we should meet again next time..
Aren't they lovely? *_*
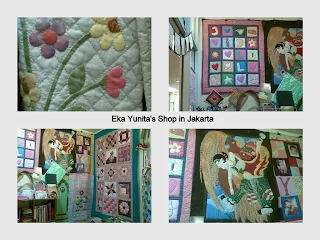
# 2. I met another Indonesian crafter who is very talented, Eka Yunita. I know her from Facebook and have been (secretly) admiring her works. She's into Felt Crafts and Applique/Patchwork and Quilting. All her quilts are hand-quilted. She's teaching Crafts in few places I guess. For more information you can visit her BLOG.
the bottom right one is my favorite. It's depiction of Indonesian wayang (puppet). All the detail works are so fabulous.
She published few craft books in Indonesia too and I bought one (before I met her). I found her shop quite coincident. I was roaming around the mall near the hotel, looking for a craft supply shop and when I saw her shop I was very thrilled. I asked the girl who sat there, and she told me the shop belong to Eka Yunita. I was so excited cos I want to buy the quilting stuff and I'd love to meet her in person. We met the following Tuesday. I thought of going to visit her again but somehow it didn't work out. Hopefully, we'll meet again next time...^_^
# 3. I got a bunch of other crafts supplies, buttons and ribbons, and few fabrics too. I admit I have huge collections of fabric and some of them are available at the SHOP. My friend, Agnes, said I'm crazy...well, what can a girl do when those lovely prints fabrics screaming at her?? You know what I mean??
This is how my cupboard looks like after I rolled (wrapped) them into a cardboard. I should've done this before. I got the cardboards from my regular shop, they're selling fabric from trousers/suit. It's quite long (30") so, I cut them into 2 and wrap my fabric neatly. I must get few more next week.
So, that's it. Now I better get back to work :). Thanks for stopping by...
Happy Crafting
Saturday, December 4, 2010
The Dolls Story
I made all these dolls out of curiosity. Saw the pattern in the Japanese book and decided to make one for my DH's cousins DD. I used casement fabric. It turned out quite cute..don't you think? I hope the little Z likes it...(off the record: according to her mom, she's a bit tomboyish out going little girl who speaks multi lingual - Hindi, English & Assamese...well yes, she's definitely adorable^_^ )
Catty...the Japanese ..^_^
And these matroyshka dolls I made based on Tutorial by's Ali from SnipSnapHappy
Instead of using Felt I'm using fabric. It's a bit tricky when doing the face part but it gets easier later..believe me. As you can see, the red ones the raw edges are obvious and the pink one it's smoother. I used buttonhole stitch in the pink one and I put fusible web to make it stiffer and to avoid fraying.

Now they belong to one Amercian girl who came to visit us on Eid :)
I will surely make again. Now my sons want one dinosaurs doll which they see in my new books. Will blog about the books later...^_^
Cheers and Happy Crafting
Saturday, October 2, 2010
Give me some sunshine
"Give me some sunshine
Give me some rains
Give me another chance
I wanna grow up once again"
(Can't stop humming this song from Amir Khan's 3 Idiots....)
This what I completed yesterday. I used smaller size hexies (1") and did the simple butterfly embroidery there. This one is so cheerful with lime green and yellow combination. Inside I put white cotton with pastel color polka dots. yeah..It's yummy pouch..:D
(detail pictures are in my FLICKR)
I still wanna do a few more small patchwork/hexies project but I got some packing to do....wohoooo...I'm going to my home country for holiday...Yay!!..
OK, time to do a serious packing now...I hope I made enough for my friends back home...^^
have a great crafty weekend everyone...
Elvira
Friday, October 1, 2010
My first Hexies
It's just a quick update. These last few days I've been sort of 'addicted' to making hexagons. I spent a loong time browsing & blogwalking and admiring all the lovelies hexies on the net. Finally I found one this this tutorial by GOLDILOKS.See, I did the 'tacking' at each corner of the folds and it saves me sometime to do the thread cutting..:D.
So far here's what I have made...I don't know yet what to make out of these...LOL. But I'm glad I didn't throw away all those fabric scraps.

and here's my first hexies pouch. I'm so in love with nanikist in flickr, how she combined the polkadots and she inspired me to make this pouch. I put side pocket inside to keep the cards and cash. The pouch is padded with thin pellon and the lining is interfaced for sturdiness.
So far here's what I have made...I don't know yet what to make out of these...LOL. But I'm glad I didn't throw away all those fabric scraps.

and here's my first hexies pouch. I'm so in love with nanikist in flickr, how she combined the polkadots and she inspired me to make this pouch. I put side pocket inside to keep the cards and cash. The pouch is padded with thin pellon and the lining is interfaced for sturdiness.
Saturday, September 25, 2010
TUTORIAL: MOBILE PHONE POUCH with POCKET
I love making this easy peasy mobile pouch. It’s great gift and it needs only a little bit of scraps and time
So, now here we go:
First of all, measure you mobile phone from sides to side and ADD 1 inch (or you can add a little more if you’re unsure/newbie)
Mine was 3” x 5 “ (4” x 6” with seam included).
Now the FUN part:
1. Get your scrap and do the following
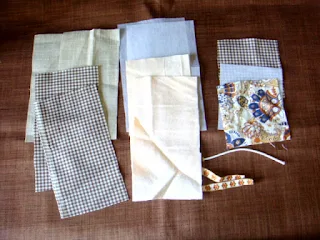
a. CUT 2 pcs ( 4” X 6”) of each MAIN FABRIC, LINING, INTERFACE & BATTING
b. Cut 1 pcs of (4” x 4”) of MAIN, LINING & INTERFACE (for pocket)
c. Cut 1 elastic cord according to your desire
d. Cut 2 decorative ribbon for the side loops
2. Iron the Interface to the MAIN fabric
3. Let’s do the pocket now.
Put the MAIN the LINING (right sides facing) and stitch along the TOP part (1/4”). Turn it around, press nicely and top stitch it.
4. Put the pocket to the bottom front part of the MAIN fabric and stay stitch around the sides the bottom.
5. Attach/Stay stitch the elastic cord and the ribbon to the back part of the MAIN fabric
6. Now arrange: MAIN (right sides face up), LINING (Right sides face down) & Batting,.
7. Now sew along the TOP part (3/8”).
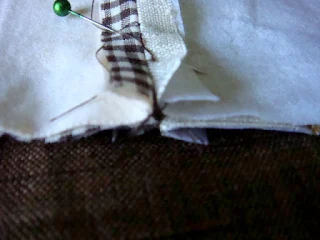
8. Open the seam (I put the batting with the LINING which is actually NOT ADVISABLE), put the LINING & the MAIN (with batting) Together, good sides facing. Match the seam & carefully PIN it.
I usually pin this part first and then pin the rest .
Once you satisfied, start stitch it around, START from the SIDES of the LINING fabric (do reverse stitch when start and end your stitch). Leave around 2” gap (when making small pouches I love to leave the gap a bit more at the sides. It’s easier to maneuver it later.
9. You’re almost there….Cut the corners and make a small snip at the corners) and now you turn it around. Ok it’s a bit difficult but you’ll manage…there you go…do a little bit of poking on each corner. It will look more of less like this..
10. Stitch close the opening and push the lining part inside the main part. Do a little more poking and when you satisfied, stitch down the top edge. This is how I usually do it.
11. Attach the button and now your mobile pouch is ready.
You can put long cord on the loop or detachable strap.
(*TIPS: while doing No. 8, I usually stitch the lining a bit smaller than the main part. It gives a better finish for bags & pouches).
I hope this is clear enough, do email me if you have any question(s) ^_^
Have a nice CRAFTY weekends
Subscribe to:
Posts (Atom)








.jpg)
.jpg)
