Powered by Blogger.

Bags and Wallets

I finished few pouches,bag and wallet the past 2 weeks but didn't get around to blog it. 

First was this Gatherer Crossbody bag from Noodlehead  and wallet from my own pattern. I love  patterns. It's so easy to follow with clear step by step instruction. This is my second bag from Noodlehead


I used Indian linen for the solid and Japanese cotton featuring Sunbonnet Sue {my fave print!} .

I change the closure with this cute flap to match the wallet. 


Now, I need to stock more on that closure. I wish I could get all these cute hardwares supplies in India. 


==============================================

The first Noodlehead Bag I made was this Super Tote I made last December. This fastly become my "go" bag. It's roomy and since I like to carry so many things, this bag is perfect size. 


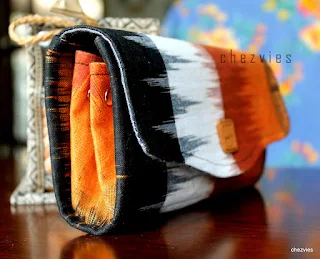
Finally I found a perfect pattern for my ikat fabric


the grey fabric is burlap or jute fabric. It's so gorgeous!!

I love ikat, be it handwoven or printed. It's just so pretty.

I even made a matching NCW clutch  from Emmaline Bags.


My bestie, Namrata of Bagstock  encouraged and helped me a lot while making this. She even sent me the rivets since my machine struggle a bit while sewing thick layers. 


And I love how it turned out !!


This one I gifted to my DH's niece. 

===============================

All the bags and wallets are available for purchase in my ETSY shop

I know I'll be making more of these.


Until then,

Happy Sewing


Lemonade Star Table Runner

I finished this!!


I was feeling listless and started opening my scrap boxes when I came across the yellow, blue and green strips, and I thought why not making another friendship star.


and so I did


I like the yellow, blue and green against the white. It give spring-y feeling. Well, I do wish spring come faster. February is sort of my "down" month. Though the temperature is pleasant, but it's dry and dusty in here. This is the season when almost everyone get cough and cold. 

When I work on a project, I choose my fabric as I go. I don't go all at once at the beginning. Many times I will change my direction or preference. 

This was my initial design. I wanted something "white-ish" as the outer border and I love this white with green flower. But after I put it together it doesn't look as good as I imagined. 


so, it's unpicking times. Thank God for Kdrama, unpicking became a tolerable activity :D . 

then I searched for yellow instead of blue or white. and I love it!

Quilting was fun and quick. Though I want to do other quilting design, but I ended up doing meandering again. This time a little bigger than the RED RIDING HOOD one. 


binding as usual is finished by hand while watching re-run of  my "good feeling" Kdrama, My Princess. 

Don't you love the backing fabric? It was just perfect match!! 

et voila!! 

my lemonade table runner!!


another shot!!

This table runner is on sale at


and if you need one of a kind Indian cotton print (like the one I used in this quilt), do visit my fabric shop at 


Until then,

Happy Quilting


I'm the happiest

birthday girl in town!!

I was thinking, I must have been done some good deeds that I am rewarded with my fave stuff!!!

Look what came in the mail this week from my fave bagmaker bff Namrata of BAGSTOCK 

You all should check her Facebook Page or her ETSY  to see her bags!  They are simply awesome. 

This birthday gift make my 7th bag from Bagstock :D
Yep, I am a big sucker for handmade bags!! 


I took the bag to piano class today and loved it! it's very spacious and easy to carry. 
btw in case you wonder, it's my sons who are doing the class, while me teaching the piano teacher quilting after class...that will be in another blog post :D

Here's another variations of Boho Bag from Bagstock

Photos by Bagstock

and of course who doesn't like these pretty threads??? 
Namrata bought them when she was learning to quilt and now since she doesn't quilt and the threads didn't work on her machine, she sent them to me


it's 79 spools in total!!!


and the Indian batik Jelly Rolls!!!


I was dancing a happy dance when the package arrived!! 

Now, I feel like making more quilts!!

Thanks a lot Namrata!! Thank you for being my friend!!
Love you, Gal!


Until then,

Happy Quilting


A bright week

This week was quite a busy week and I seem to be in a bright mood as you can see from the works I've completed this week. 

Today I finish this mini runner after watching MSQ Youtube  Tutorial on Double Friendship Star block. It's so easy and fun to make. I made this with  2 red riding hood FQ  and a scrap of solid white. 


And I still love using my variegated thread so I used a light red-white one and love how it turned out. 


Very often when I'm cutting fabric order for my customers, idea will pop out in my mind. This mug rug happened like that. I thought I just had to make a quick mini mat with this one. I made pink one earlier and gave that to one of hubby's aunt. Indian fabrics print and color are so attractive that practically you only have to quilt it. 


Still in orange mood, this mobile pouch was made for a client. She saw my patchwork pouches and wondered if I can make a similar patchwork for iPhone pouch. And why not? 

frankly creating your own patchwork so much more fun than using printed patchwork fabric, right?


and with the same fabric she wanted 2 patchwork pencil cases

I did this passport wallet with this african print. I have mini quilt still in WIP state with the same print. I added names in the passport wallet but not in the pic ;)


in the last post, I mentioned about embroidery patches. I did the pouch and add the patch but not happy with how it looked. So, I took out my embroidery machine again and did the embroidery directly on the pouch. Now, I like this better! 


That's all for this week. How about your week? I hope you had a good one too


Until then,


{Tutorial} DIY Printed Fabric Label


There are so many tutorial you find online how to make DIY fabric label. I have one DIY Label tutorial using fabric pen and now I am going to share how I do DIY printed fabric label. 

First of all, here in India I don't get freezer paper, so I used fusible interfacing which is called "pasting" by my local supplies shop. It's a thin woven interfacing which is used as backing for machine embroidery. There is one with glue on one side (hence it's fusible) and there's one without glue. I used the one with glue on one side. 

So what you need is :
~ a piece of fabric --- cut into A4 size 
~ a piece of fusible interfacing --- cut into A 4 size
~ transparent nail polish
~ Computer & printer (I used laser jet by the way) 

#1 - Design your label on your computer. I am not very savvy with computer program, so I use MS word and used a mailing label template to create my label :D 


#2. Fuse your fabric on to the fusible interface. Be careful with the setting. Set the iron on WOOL and press few second on one side before moving it around. Than way you will get a crisp papery fabric. I used linen in here. 


#3. If you're happy with your design, print it out onto the fused fabric. I suggest you run a little print test on paper or at the back of the fabric (the interface side)

and when you're done, cut and dab the edges with a little transparent nail polish to prevent it from fraying. Well, unless you have fray check, which I don't ^_^. 


It's easy, right? You can add your logos or if you have color printer that will be wonderful. 

I made my quilt label the same way and I read somewhere (sorry forgot the blog), if you soak your printed label in white vinegar for 10-15 mins that will prevent the ink from fading. 

This label is for stuff which does not need frequent washing. 

And you can check HERE for more tutorial. 


Until then,

Happy Crafting 


Latest Video