Powered by Blogger.
Showing posts with label patchwork pouch. Show all posts

Scrappy Patchwork Pouch

Hello, 

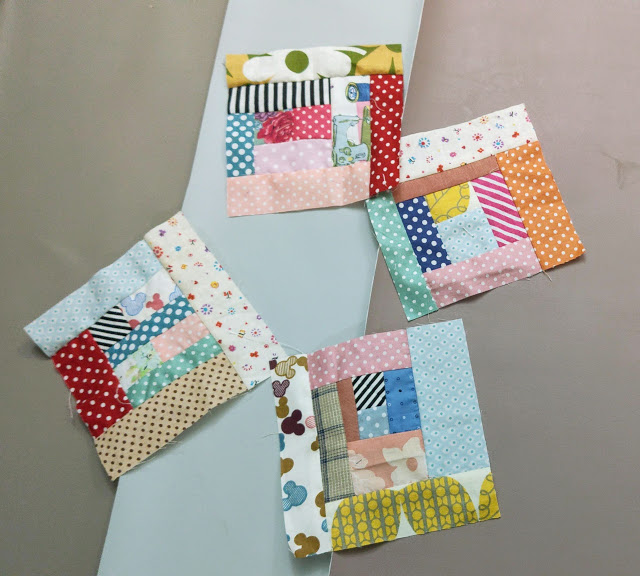
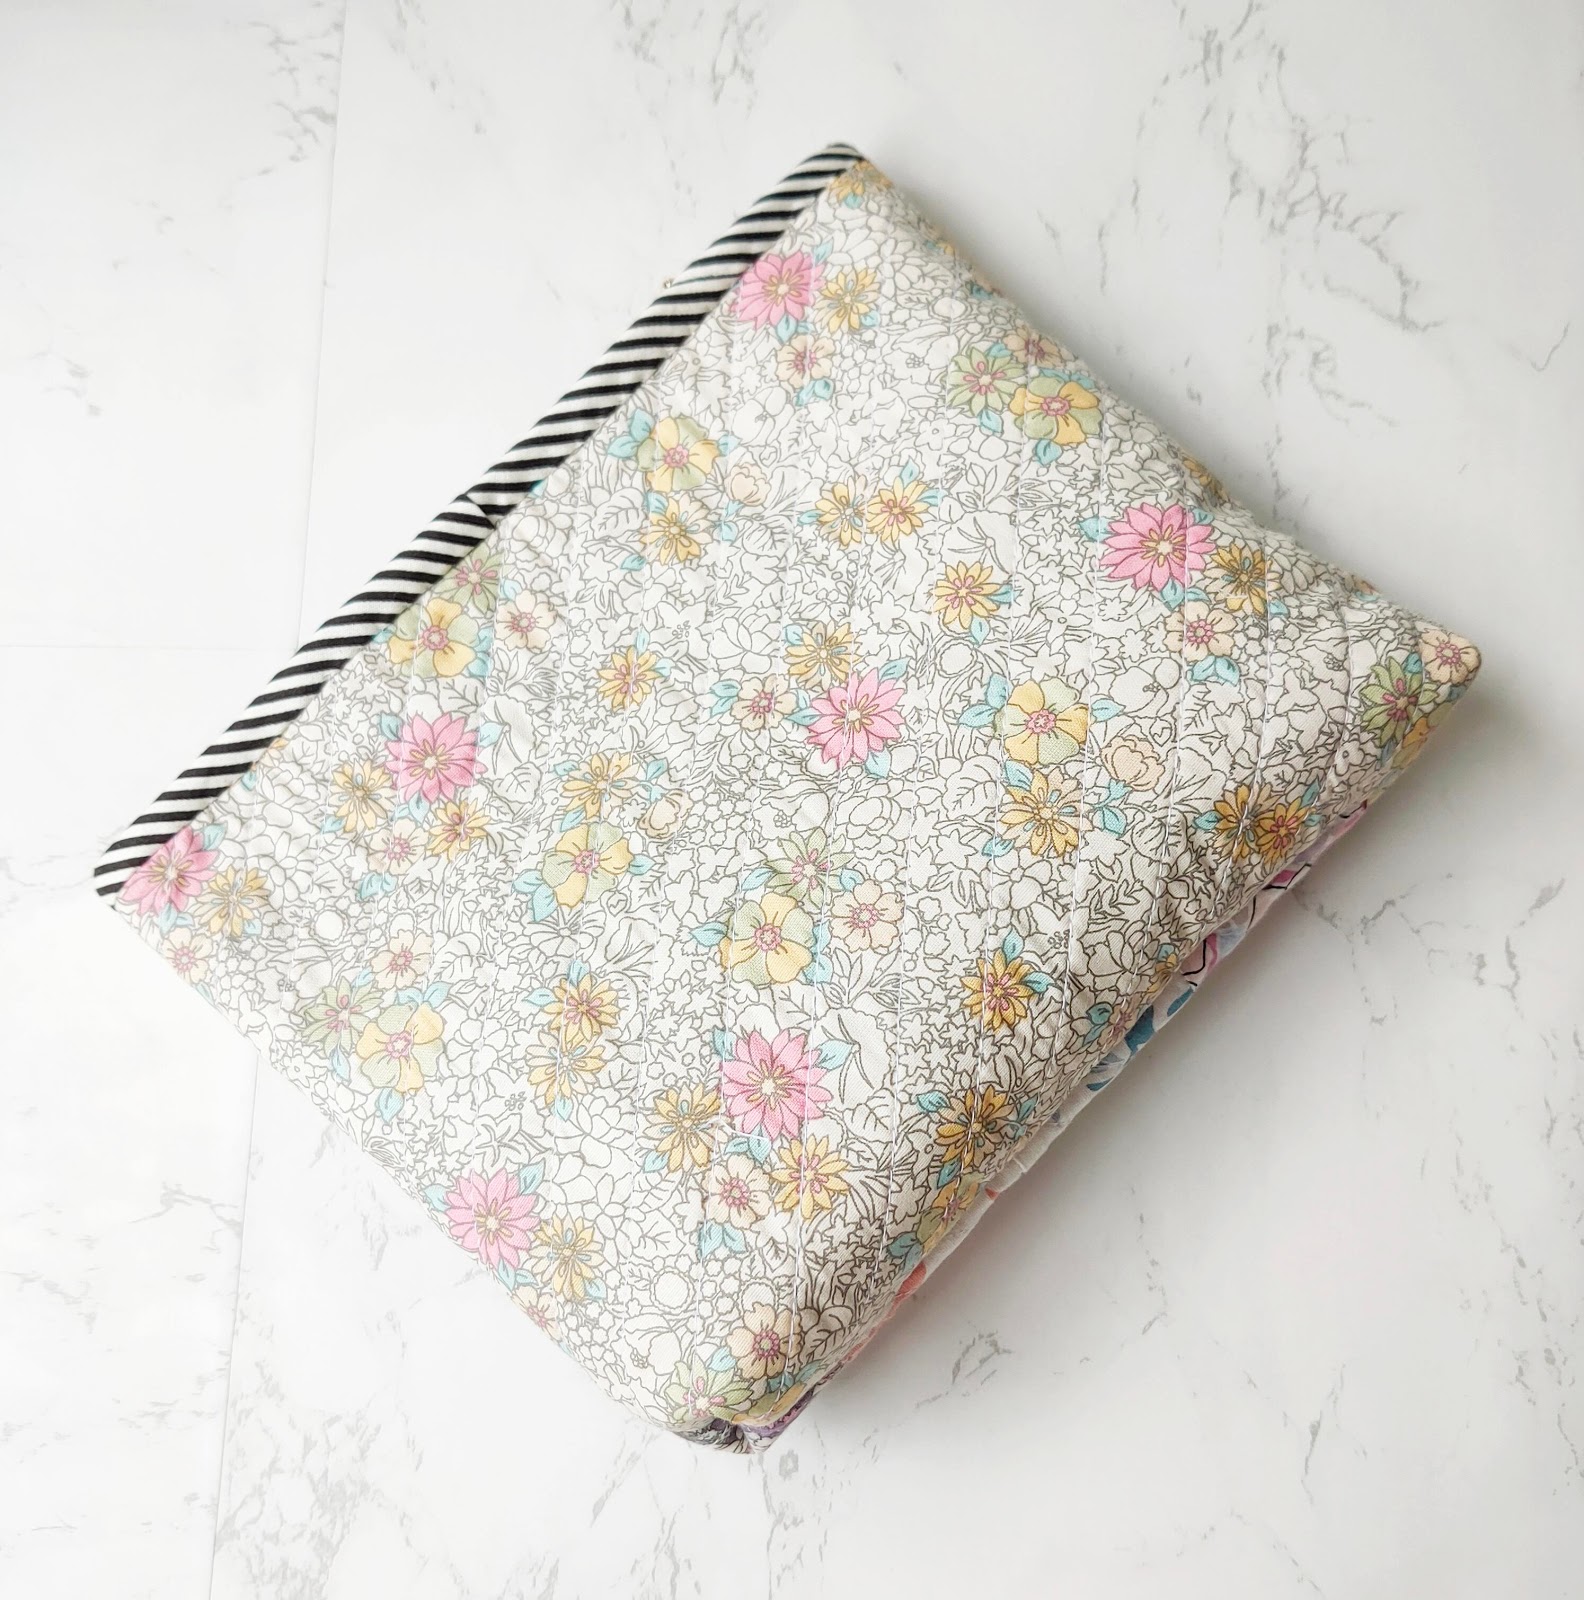
A few months ago  I made a quick patchwork pouch from block print fabric when I was creating fabric bundles for the shop.  but did not get to share them here on the blog. Cutting fabrics always boost my sewing mood.  And who can resist when you see these beautiful fabrics! 

If you have a lot of scrap fabrics, here is a fun project to make. This project is super easy and it's a great gift to make. Everyone loves patchwork pouches! 


Here's what you need to make the pouch: 

1. Fabric scraps of various prints, sizes, and colors. I am using these fun fabrics

2. Scrap Cotton Batting (9" x 13" approx)

3. All Purpose Woven interfacing (7.5" x 12" ) - ( if you are in India, you can get it HERE)

4. Lining Fabrics (7.5" x 12") 

5. All Purpose Zipper #3  - I am using a 9" zipper. 

Now, let's watch the video on how to make this cute quilted-as-you-go pouch. 


Isn't it fun? The pouch turned out very soft and just the perfect size to carry essential makeup! You can whip up this pouch in a few minutes to make a quick gift! Let me know what you think in the comment below.

Thank you for stopping by today!

Happy Sewing

Elvira


Linking up to these wonderful BLOGS


**************************************************************************************


HAND BLOCK PRINT FABRIC BUNDLES


Let's make charming quilted pouch


patchwork bag tutorial
Charming Quilted Pouch (video tutorial)


When Tina Katwal asked me if I'd like to make a quilted pouch tutorial for our Desi Quilters group, I immediately said yes. I was thinking of making one with handloom fabrics as the 7th of this month was National Handloom Day! So it was like serendipity. 

So, I decided to make this pouch or bag using my fave precut - mini charms (2.5" x 25" pieces). To make this bag, you don't need much. 

Materials you need:
20 pieces mini charms of your choice
(40 pieces if you make a patchwork of both sides)
A few Fat Eighth or FQs for Back Panel and lining
Batting (fleece or cotton)
#5 Zipper at least 10" long
(you can use #3 zipper if you wish)
Non-Woven Lightweight Interfacing  
Finished Size 9.5" x 8" (approx)

This patchwork pouch tutorial is for the Love and Healing Swap in our Desi Quilters Group on Facebook. The pattern is for using mini charms but you can easily adapt it using any kind of block or orphan blocks that you have in your UFO baskets. The key is to make the patchwork piece the same size as the interfacing. 
The interfacing will give a perfect finish for the quilted pouch or bag, no matter what batting you're using. I made many patchwork quilted bags and I found this combo is the best. 


Working with handloom fabrics is pretty challenging. If you decided to make one using handloom fabrics, consider prewashing your fabric first. I normally don't ;). As handloom tends to shrink and become out of shame from frequent ironing. Spray starch also helps. 


National Handloom Day


I'm getting a little bit better with the new editing app. I also found a good angle to place my ring light while recording videos :)
Editing does take time but when the mood is good and the boys are happy with Domino's, I can get it done pretty quickly ^^


zipper charms


I hope you enjoy the video! Do let me know in the comment :)
Now, download the pattern below, and let's start sewing those scraps!


Happy Sewing,

Elvira


Scrappy Patchwork Pouch


Another scrappy patchwork but this time it's a flat pouch!! I made few quilt as you go pouch few weeks ago from the scrap bag I keep near my sewing machine. The bag is overflowing with my recent scraps now and waiting to be sorted out. 


I took out a bunch and started playing with it for fun. I made 4 scrappy blocks and each is around 5" squares. And since I got new faux leather sheets, I decided to try to combine it. 


I use cotton batting, a scrap batting from my flying geese quilt and quilt it around 1/4" apart. I really love the effect of dense quilting on the pouch. I used high grade faux leather here. The color is almost salmon pink, a bit darker.


I added small slip pocket inside. I love the cute bear print lining. I found it in my stash! So glad to finally use it. 


I added this pretty pouch in the SHOP in case you want it ^^. The pouch dimension is 8.5" W x 5.5" H.

Working with patchwork is really fun, especially scrappy one. If you have orphan block lying around and want to try your hand on making patchwork bag, you might want to try THIS PATTERN.

Thank you for stopping by!

Happy Sewing,

- Elvira - 

****


Why blogging is important to me

In the past few months, the Facebook Group of Etsy Sellers have been about the changes in Etsy Advertising. Well, they say change is the only constant. As a seller, we can't do anything about it, because we can't control what the Etsy management or shareholders want, right? 
The same goes with social media ever changing algorithm. As a  user,  we simply has to adjust our step to match their changes. Last week, I found that some of my Instagram Story Highlights are blank! I updated the app and they are still missing. This made me think, that we can't rely too much on social media too. We work so much to make beautiful posts and suddenly one day we'll find they are all gone? What will you do?

I'm glad I still have my blog. Though I haven't been able to write so much recently, but at least this blog is here. I can easily look up  the archives or search the blog for my past works or simply to read my earlier posts. Many friends asked me how to promote their products. Well IMHO, there is no exact formula, simply do what you're comfortable with. What you want to do? What is your future goals? etc. As for me, I want to keep enjoying what I am doing while at the same time, giving something back to the crafting community through this blog by sharing few tips and tutorials. Frankly, my blog is still one of my biggest source of traffic when it comes to Etsy or my Website. 

****

And here's the pouch that  I forgot to post!  Ehm, actually this post was in my draft folder and I forgot about it. Anyway, this another combo of denim and patchwork pouch. You can see the tips and video of another pouch I made in HERE.

Patchwork Pouch


Mini slip pocket for cards


Plain denim at the back

I really love working with denim and I'm glad there is one shop here which carry different kind of denims. But my fave is this dark blue denim. This pouch is very simple, it has one slip pocket inside. The size is perfect to carry your phone or passports. Well, we always need more than one pouch, right? I love making pouches and keep them. They make a great impromptu gifts and everyone love handmade pouch!

The pouch is available in my Etsy as well as in my Webshop

Thank you for stopping by,

Have a nice day!

~ Elvira ~

Scrappy Patchwork Zipper Bag

Hello,

Patchwork Zipper Pouch


Autumn is here, though we don't have the colorful leaves but the weather is very pleasant. I made few stuff last week, aside from few custom orders. Well, sometimes we have to make time for fun sewing, right?


One was this quilted zipper pouch which I made from scraps. I bought the scraps from Indonesia and the scraps are quite small, around 6" x 18" and some of them are uneven cuts. I cut few of them into 2.5" squares (my fave size) and choosing few dark, medium and light value from the squares. 

Work in Progress

I really love working with small scraps of fabrics and I promised myself that I will make more scrappy projects for myself and also to share with the world :D
I used fun apple print cotton fabric for the lining. It really brighten up the pouch. 


I was going to do the regular zipper top closure, but I want something to zest it up a bit. I have many bias binding from making passport wallets, zipper with binding is the obvious choice! There are 2 ways of attaching the binding that I did. The one like in THIS pouch or THIS one where I attach the binding strip to the main fabric before attaching the zipper.  On this pouch though,  I sewed the zipper first then attach the binding with machine on one side and then finish it with hand sewing. Insha Allah I will make a tutorial when I am working on the next one. 


I did simple diagonal quilting here with the help of  washi tape! Well, I usually just eyeball it though :D. On the other side, I used floral print and quilt it in the same manner. And if you're wondering about the tag which I attached on the side, it was not intentional. The fact is I forgot to attach D ring and had to make an improvisation here. 


 Please let me know what you think in the comment below. Thank you for spending time reading my post, I hope I can inspire you in a small way ^_^.

Happy Sewing,
Elvira


Scrappy Patchwork Pouch


Few weeks ago I made few scrappy log cabin blocks and share it in my Instagram. I was cleaning my sewing room and sorting out my scraps and instead of finish my cleaning, I sat down and started making a few blocks.


I really really love scrappy blocks and log cabin is just the easiest. The no rule log cabin blocks!  Since I completed my log cabin quilt I really want to make another one. 


These blocks are 6.5 x 6.5 inches and I really don't have any particular plan. So a few days ago, I made this pouch. Simple flat pouch.


I added a scrap denim which I have in my blue scrap bucket. I love using lightweight fusible interfacing and batting for quilted pouch. They are a perfect combo if you don't have fusible batting. I used fleece batting here. Really, you can use any batting like foam, flannel or even your old fleece blanket. Re-purpose or up cycle is always a good idea!

I used metal zipper this time. I really love the look of it. You can check my IGTV where I show you how to install metal zipper pull. Once you learn the technique, you will love it! 


I made a time lapse video :) I really want to make a proper tutorial video but it needs a lot of preparations and set up. Hopefully later on I can start sharing a better videos. In the meantime, I hope you enjoy this one. (don't forget to share and subscribe :D ) 
The pouch size is 6" x 8" which is a really great size. Just big enough to carry your phone and few stuff. 

Thank you for stopping by.

Happy Sewing!

- Elvira - 

Linky Party
Handmade Monday
Moving it Forward

Handmade monday featured.jpg

Double Zip L Shape Pouch


Don't poison your soul with hate. It's too huge of a burden to carry. Learn to love & appreciate. It'll make you a better & happier person inshaAllah! - Dr.bilal Philip

*****************

One of my favorite shopping  is buying Pattern Kits. I know it is expensive but it is one way for me to learn about materials and also learn about new technique. This year  I bought a few and finished 2 of them.  Yes it is a challenge when the kits are not in English. Sometimes even the google translate is a bit difficult to understand. Especially if the kits are written in Kanji! 


I usually will open the pattern pieces and scan each sentences/word onto google translate and try to make sense of it! Then, trying to figure out the pictures instructions in a single piece of paper. So, basic bag making or sewing and diagrams. The kits usually come with a very simple basic diagrams and knowledge is important if you're considering to buy kits. But once you figured it out, everything else is easy!


I started this pouch a few days ago from the Kit I bought in the Quilt Show. The kit includes fabrics, binding strip and zippers. This is the first time I tried installing the zipper by hand!! and to tell you the truth I LOVE it. 


By the way, here I didn't use the fabrics etc from the kit. Since this is my first trial, I used fabrics etc from my stash. Maybe I should have used polkadots lining instead of the handloom linen fabric. 


I kinda love this pouch. Maybe can add this kind of pouch in the shop later on. What do you think? 

Thank you for stopping by!

Have a nice weekends!

- Elvira- 

Patchwork Pouch

Hello,

Never threw out even the smallest piece of your favorite fabrics! You can turn them into this pretty patchwork pouch


I was organizing my small scraps last Saturday and as a bonus, I decided to make this pouch. Actually I started out with card holder in mind. I even took out Suzuko Koseki book for guidance. 

I decided to do quilt as you go method since some of the scraps are quite tiny. And when the panel is ready, I was thinking, it will be better to make pouch! 
So here is the QAYG pouch with 2 different sides. One side is sober color and a bit brighter on the other side. 


I love zipper with binding, I made once and have not attempted again. So, this time I decided to do just that. Zipper with binding! and I love how it turned out.


I added faux leather tassle too. It's uber cute!! Each piece of fabrics in this pouch has a memory of it's own. Some of them are from the leftover binding, some are from the corner cuts of a bag, etc. It is  a special pouch! If you want to purchase the pouch, it's available HERE

I know I'll be making more, but there are so many other things I want to sew. My list keep growing. 

Thank you for stopping by!

Until then,

Happy Sewing


one of my 2015 resolution

is to put a good use of my scraps. 

This little pouch is as a kick start project.  I used my postage stamp block to make this


everyone asked me about the pink sewing machine ^_*
it's too cute, isn't it?
I got it when I was looking for super heroes figures for my sons and I know I should buy it ^^


I simply love using decorative stitch for quilting


That cute button I got last year from Indonesia
I just could not resist anything cute

This pouch has gone to one girl, who visited me last week
she just could not let it go once she saw it. She said she's going to put her clips in it ^^

if you want one, I list this in my ETSY shop too as custom order

I have {more than} enough scraps to make this pouch ^^

Until then

Happy Sewing


Nice and Bright Quilted iPad Sleeves

I love the process of making this sleeve


The moment she said she wanted something in fuchsia, orange and blue
I started pulling fabrics from my stash
you won't believe it, Indian fabrics have a LOT of shades of fuchsia


I was like "which one is more fuchsia, should I go for the darker one or the lighter one"
she wanted something like the coasters


Once I decided on the fuchsia and orange batik, I had to pull out blue fabrics
again it was a battle for me
And I found this solid blue cotton hidden in my solid stash
just the right one!


I like to hand sew my binding
unless it's a big quilt ^o^
I always leave the hand sewing part at night
when I can quietly sew and watch my favorite drama


ah now, it's done and delivered
it's a good feeling to think that I - who live in the corner of North East India - made something for someone so far away


"if there's a will, there's a way"
Now I truly believe it! 

=============================


This iPad sleeves is SOLD but I still  have the fabrics.
If you need one, simply drop me a line in my SHOP 

I tried making cover for my button jar
not as good as I wanted it to be but that's fine ^^
(my friend Agnes said "Now even your jar is wearing a kaffiyeh" LOL")


and I made a keys cover from the little remnants. 
Someone is going to have that cover ^^. I hope she will like it.

Until then

Happy Quilting


Latest Video