Powered by Blogger.
Showing posts with label fabric wallet. Show all posts

Rosie Wallet with Flap Closure

Handmade Wallets


Hello,

Last month, I made a few Rosie Wallet orders. This time the customer wanted a flap closure. This is one quick wallet that you can make over the weekends. The original pattern has a hidden button closure.


This year I promise myself I won't buy new fabrics and will only sew from my stash! and these are some of them. Last month I was busy sorting out my fabric stash, organizing my bag-making supplies and organising my WIPs. I found this metal button which matches perfectly for the wallet! Metal buttons, especially the antique color, give out rustic vibes, which I love. 


I use handloom or hand-woven cotton fabric from my stash for the fabric combo. I have always been fond of Indian handloom - its multi-hued colour looks very nice for my projects to use as an accent or combo. It's also easy to work with. 


Rosie Wallet pattern


The Rosie wallet is small and compact, it's just perfect to carry around every day. I love to carry one when I use a smaller handbag or crossbody bag. Nowadays, with mobile payment becoming more common, I hardly have to carry my credit or debit cards although I can literally fit in 10 cards in this small wallet. 

You can check out my latest wallets in my ETSY shop or on my WEBSITE

And if you want to make your own Rosie Wallet, it's available on my ETSY SHOP  and SEW MODERN BAG


Thank you for stopping by today! 

Have a nice day 

Elvira 


Classic Wallets

Classic Bifold Wallets


Today I realised that  I'm entering 17 years of blogging! The whole afternoon I browsed through my blog and found a post about my elder son's first day of school! I looked at the photos and some of them are dark. Back then, there were no fancy editing photo apps, let alone a filter camera! How time flies and how technology is so much more advanced right now. Like I literally click photos on my iPhone and within seconds I can edit them and sync them to the cloud storage so that I can put them up here on the blog. It's so much easier now. 

Reading old posts also got me thinking, what if I want to quit Facebook and Instagram (I have been thinking about this for some time now).  I recently deleted one of my Instagram accounts where I posted my fabrics, and within 1 month, there's no trace of my post. As if the account never existed before. I mean we worked so hard to put pretty pictures and meaningful content and it can just be gone! 
Well, one may argue to not delete the account but keep it. The problem is many hackers are lurking around there. If your account shows any inactivity, these hackers can just take over it and the next thing you know they will be asking for money from your contacts there. So it's really a dilemma! 

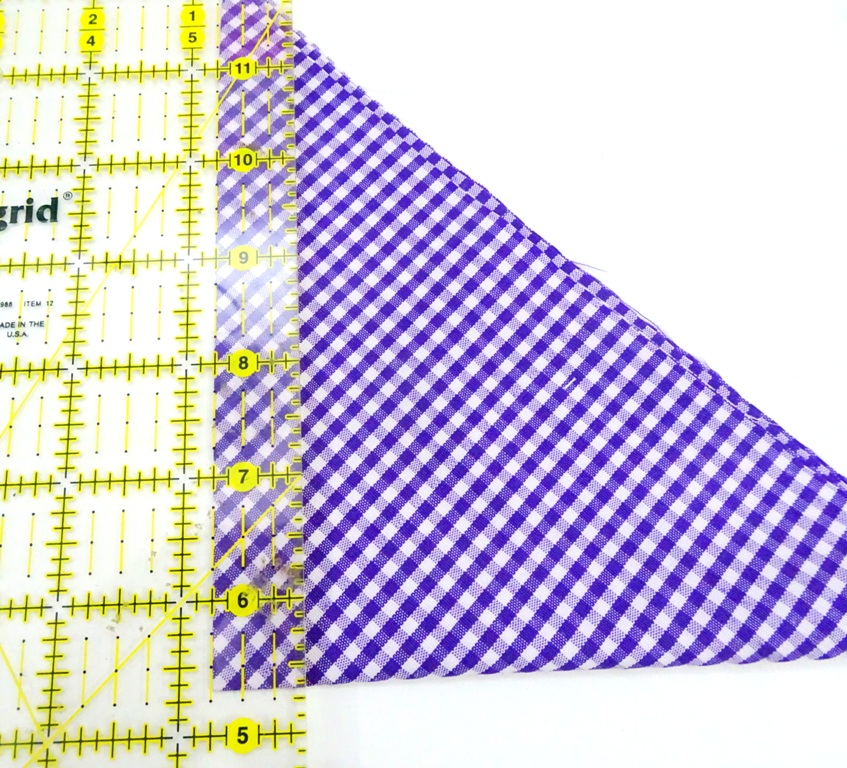
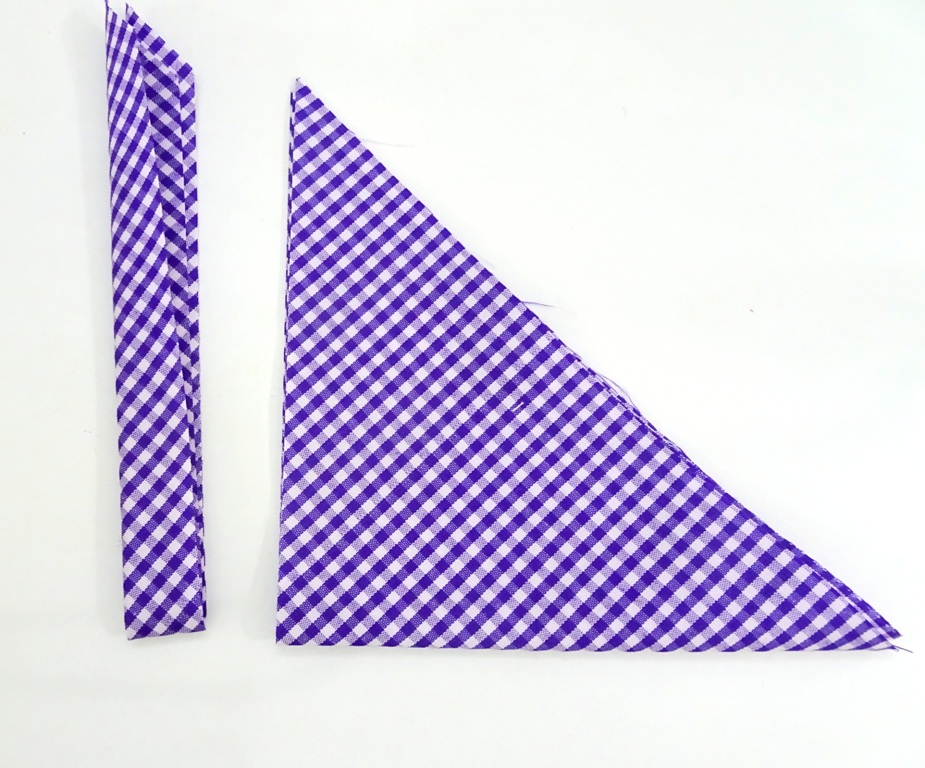
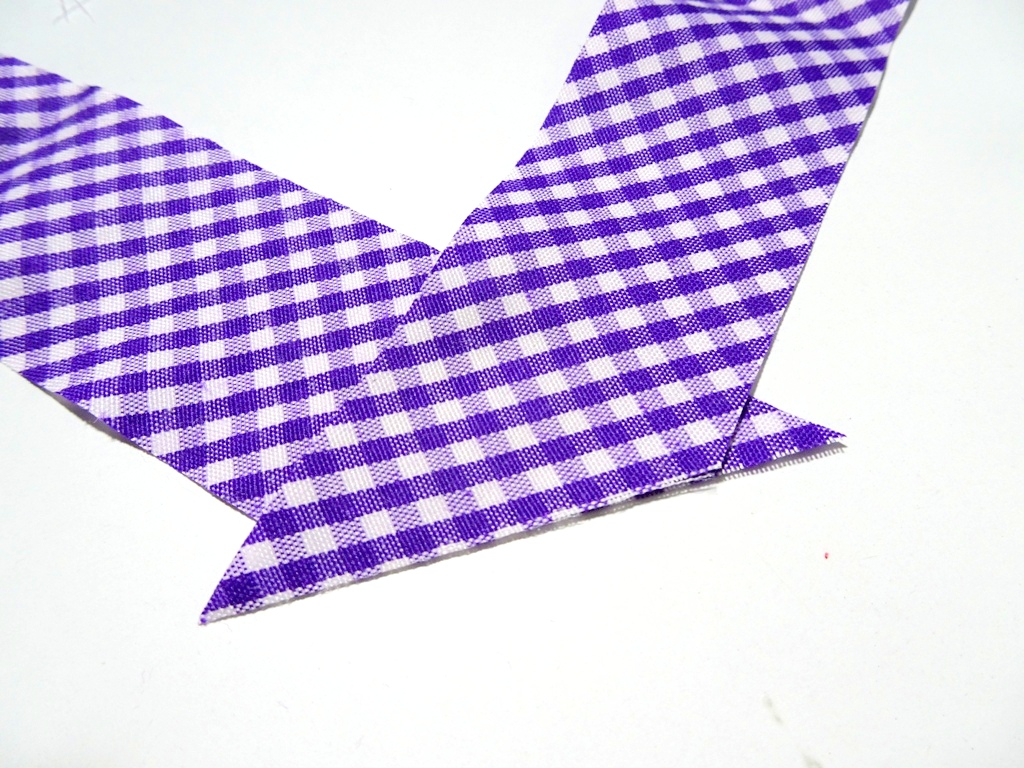
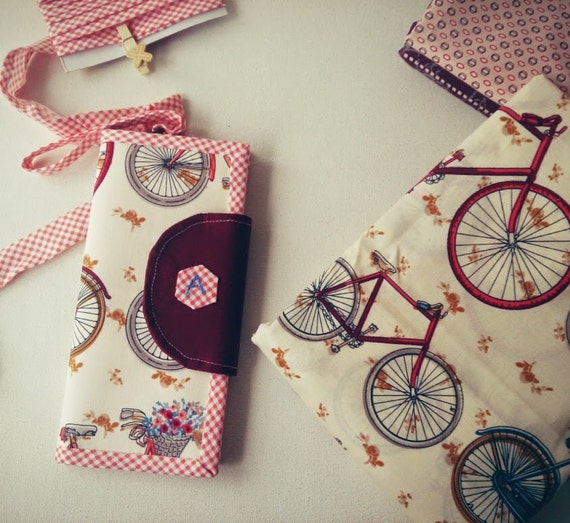
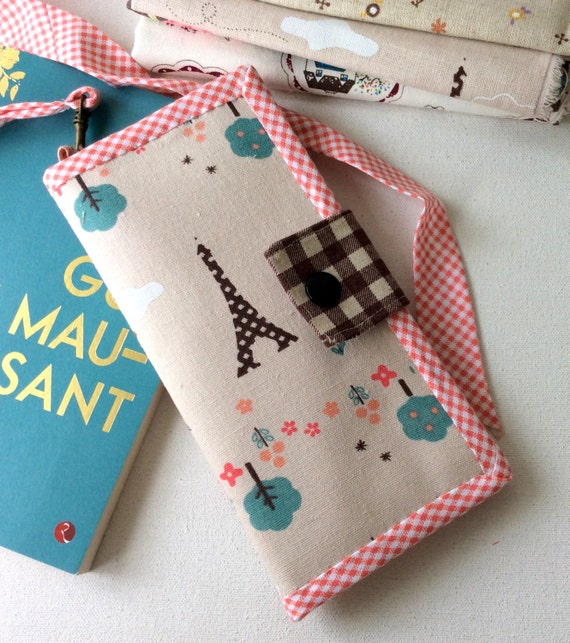
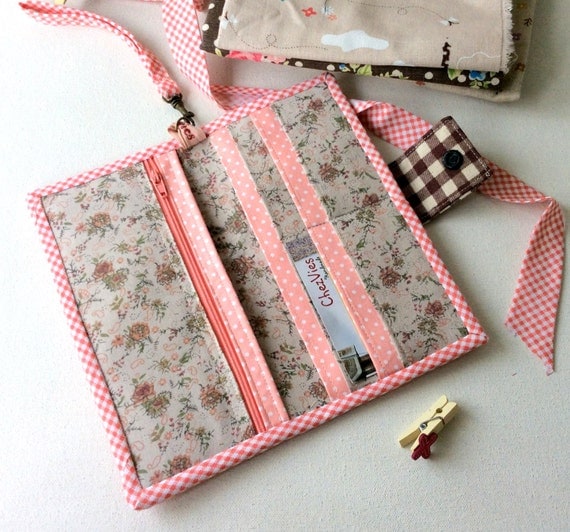
Anyway, back to sewing, I made these two wallets a couple of weeks ago. As I mentioned in my previous post I will only use fabrics from my stash and these are some of them! The blue sakura print wallet is made from Kimono fabrics that I bought from Nippori a few years ago. I think it's a cotton mix, but I am not so sure. It has a soft texture and the color is so pretty. It's a bit tricky to work with because it frays quite a lot so I need to be extra careful. 


Blue Sakura Wallet


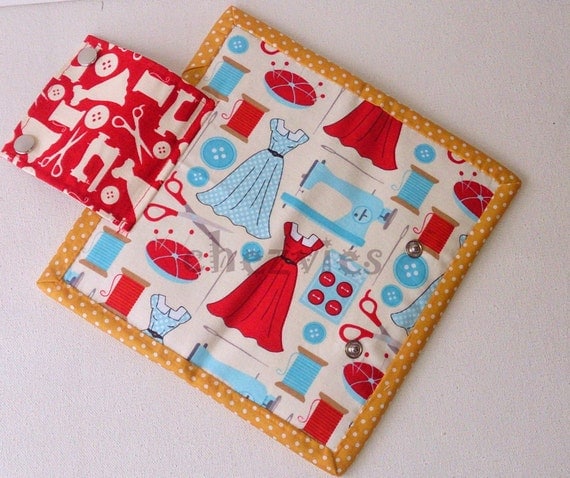
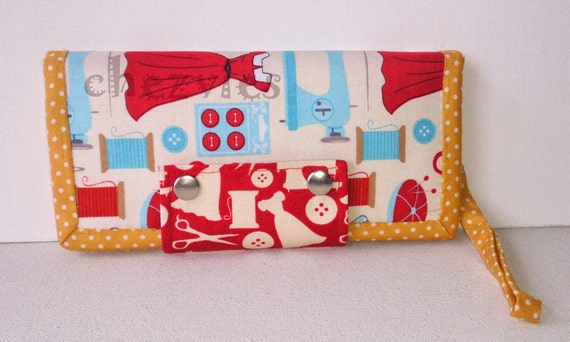
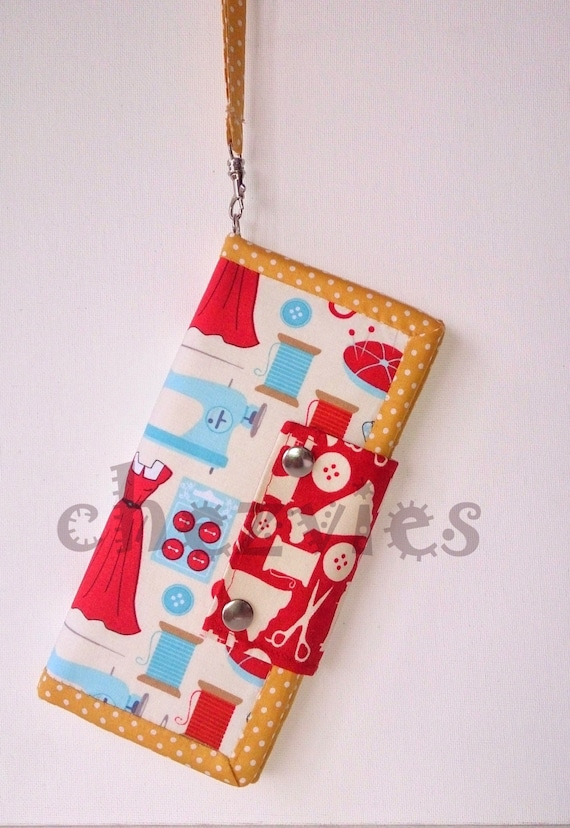
The second one is this patchwork print wallet. After making the small zipper wallet, I thought let me make the bigger wallet. Using the same fabric combo, this time I make it with a curvy edge because with gingham bias binding it will look better! 
I have the same patchwork print in purple and made one wallet with polka dots binding. I really love this patchwork print, now what should I make next? 


Patchwork Wallet


patchwork wallet

 
The purple patchwork wallet


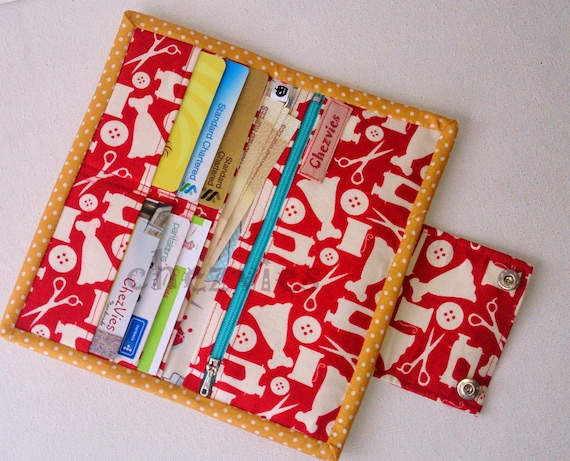
The wallet features: 

* Dimension : 4" W x 8" H
* 6 card slots
* 2 long slip pockets that can fit in a smartphone
* 1 long zipper pocket for coins and other important stuff. 
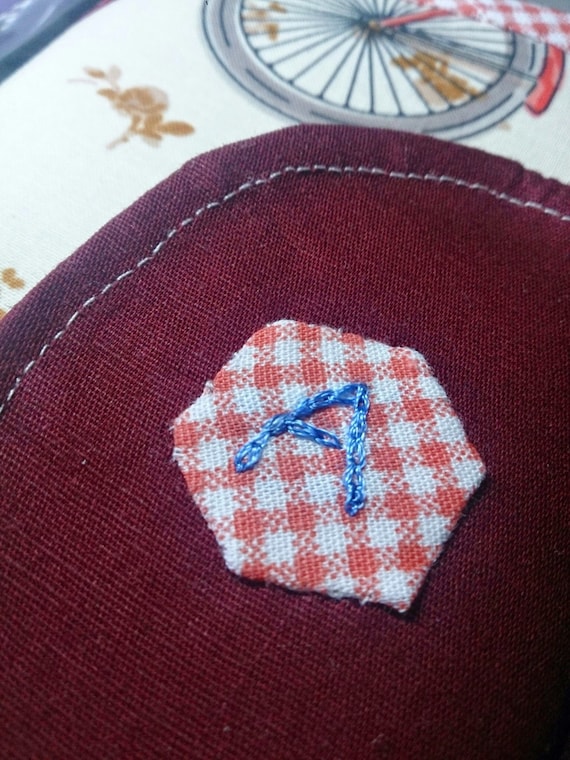
* Close with snap button
* Finished with hand-sewn binding for extra strength
* Interfaced and padded for durability.


Since I got into the habit of batching my work, now I have a lot of projects ready to sew. I cut and interfaced several projects every week and kept them ready for when I had time to sew. This way, instead of starting a project from scratch I can just pick up one and finish it. Like this phone crossbody bag. I still need to make the strap but the slider adjuster for the strap is coming only next week. So have to keep it aside for now. 


And here's some of my WIP 


That's all for today. Thank you for stopping by and reading my blog! 

Happy Sewing!

Elvira


Mini Tutorial - How to make bias binding strip for wallets

Hello,


Today I will share a little tutorial on how to make your own bias binding. If you follow my blog, I love using binding for all my wallets. Though sometimes, I tried to make one without binding like this wallet. 

Bias binding strip is a narrow strip of fabric cut diagonally (on bias). There are many tutorials and video tutorials on how to make a continuous bias binding, but I prefer the good old slow method. The extra minutes of making this binding will be so worth it!

Ok, in this tutorial I used a square fabric 10" x 10" which is sufficient to make binding for single wallet. Bias binding effect is best if you use gingham or stripe fabrics.

First, make sure that your fabric's grain is straight. If not, do straighten your fabric first. This is very important!

Now fold the fabric diagonally 


and then fold it again (upwards) to create a small triangle shape


 Then using the quilting ruler and rotary cutter, cut the first strip 0.75" wide. That will make a 1.5" Wide binding strip. 


 Then cut the next strip 1.5" Wide. Continue cutting until there's small triangle left. I normally do not use the smallest strip but I keep the leftover triangles for scrap projects. 

Now, take the first strip that you cut and straighten the end of the binding strip.


Take the second strip, lay the triangle end on top of the straight one, RIGHT SIDE TOGETHER and overlap  by 1/4" . 

Sew diagonally with 1/4" seam allowance and trim. 


Take the next strip and lay the triangle like in the picture below (right side together) and overlap by 1/4" and sew with 1/4" seam allowance.


The strip will look like in the picture below and ready to be sewn into the wallet!


I really love how this gingham binding look on this Purple Flower wallet


See, it's super easy! It may seem like a lot of work, but this method will always yield a perfect bias strips! Don't be afraid, go ahead and try it and let me know how do you like it!


Have a lovely day!
Until then,

~ Elvira~

LINK UP:


Coming Soon ~ Card Wallet Organizer Pattern

I'm so excited to announce that my second PdF Pattern is coming  real soon. Right now it's being tested by my fabulous Facebook Friends (I love facebook for that!!) 

The tester photos have been coming out really fabulous!! I love how everyone is using different kind of fabrics and each one is so fantastically pretty. (sneak peek photos soon!!)

I have made few wallets from this upcoming pattern few months ago (here and here)
 

Pattern making is a learning process for me. Even if I wrote several tutorials before, but selling pattern is totally different. There is a certain degree of  responsibility that I feel. Maybe it's just me, but I want those who buy my pattern will feel "yes, it's worth it".  From my First Pattern I learned  how to convey what's in my head  with less confusing sewing terms or less confusing photo angles. I tried my best to use a simple English that can be understood by non English speaker. 


This time around, I learned to make graphics (instead of photos) to use in the instructions and also added alternative designs (yay!!)


I've been trying out the pattern using different kind of interfacings too, I will elaborate more in my next blog post. 

I'm so excited about this pattern! I'm sure you will love it. 
Sign up for updates in the top right corner of this blog and get the first  updates of the release.

Until then,

Happy Sewing


It's February already

 I decided to participate in  Husqvarna Viking India 2015 Quilt competition and I'm currently working on it. It's a slow progress though and no, I can't show my WIP in any online media. Yes, that's part of the rules! And me being an Instagram addict, I can only click pics and saved them in my computer *sigh* 

Wish me luck folks!! I need lots of them ^_*. 


So, how's your January going?
Mine has been quite good. Thought I don't finish any major projects as yet, but slowly I'm trying to empty my UFO bins {I started few months back} and I feel good inside. 

And while I'm watching my fave Kdrama, I made few of this fabric flowers from left over bindings. I love fabric flowers and I have quite few brooches and hair pin. I kept them ready as a gift ^_^. 


I realized that everyone - yes, everyone- love handmade gift! 

 I completed this Family Passport Wallet for my customer's in my Etsy Shop


I went for thread shopping and look what I got!!
3 boxes of thread of total 60 rolls for less than $3 


and speaking of UFO, here's few coasters I made from my orphan blocks!


Finally! the super cute baby Anya with my quilt *feeling proud* 


Oh I can go on about this cutie pie, I keep asking Norah to send me her pics cos she's so adorable
she's an Indian-Chinese baby and she's almost a month old
but she can make all kind of cute expressions!
I wish December come quickly, I really want to hold this newest member of our big Indian family!

Until then,

Happy Sewing


Wish you happily ever after


Love and marriage, love and marriage
Go together like a horse and carriage
This I tell you brother
You can't have one without the other


Love and marriage, love and marriage
It's an institute you can't disparage
Ask the local gentry 
And they will say it's elementary


Try, try, try to separate them
It's an illusion 
Try, try, try, and you will only come
To this conclusion


Love and marriage, love and marriage
Go together like a horse and carriage
Dad was told by mother
You can't have one without the other
{Frank Sinatra's Love and Marriage}
❤❤❤
Made this wallet as a gift for my fave cousin-in-law who's getting married next Sunday
Congratulations to each of you on finding someone so special to lean on, laugh with and love always
With warmest wishes and love, today and always

❤❤❤


Handmade Wallet again

My friend's daughter is cyclist and she's got few medals up her sleeves already
One day the mommy saw my wallet and asked if I have bicycle print
I said of course I do {see, this is why I need to buy certain fabrics}

After pulling out a bunch of fabrics to match, I came up with this one


I add a little hand embroidered monogram there


and since my previous wallet was taken by my dear sister 
I need to make one for my self


Finally I got to use my linen! 
I bought FQ bundles from Etsy few months ago


I'm quite happy with the result

I love to keep my debit and credit cards in the zipper pocket
I feel safer that way ^_*


I remember a friend recently complaining about her work 
she was not quite happy with her work
even though I told her, she's done very well
considering she just picked up sewing

Well, for me, HANDMADE should LOOK handmade
 all the imperfections will make it more special

Btw, did you notice the binding?
I just recently decided to learn to make a proper bias binding
I always thought it's tedious to cut diagonally and sewing all those strips together
I googled and found several tutorials 
but I love this tutorial on you tube


2 things you must REMEMBER while making bias binding 

1. spray starch your fabric before hand. This will help you while you run it through the bias maker. and since bias cut fabric tends to stretch, the starch will help you to control it.

2. Mark it properly 

And here's what I got 


So, when you're not in the mood to sew
why not trying this one
this surely save you a lot of time

Wallets available for custom order at CHEZVIES

Until then

Happy Sewing


Say it through your wallet...

a handmade fabric wallet that is ^v^

I have this cute fabric lying in my cupboard for over a year now. I bought it through a friend who lives in the US of A. We have this chat group on Whatsapp where we shares ideas, jokes and our fabric loot. But the shipping from US is killing me, but then there's nothing like a good investment (said a fabric hoaders of course). Ha!

Anyway, I bought few pattern of wallet and reading numerous blog post and finally settle for this simple wallet. I wanted something sturdy but light, compact, fit in my notes and few coins. And which will fit in into my purse. 


Hmm...I'm using my old leather wallet as a benchmark for sizing. I made a little bigger and wider version, since Indian currency notes are quite long.

look at the outer fabric! I love love it!

I used two grommets snap buttons. Psst, it's not that hard to attach these buttons. 


Since I don't like to waste fabric, I make wrist strap from the remaining binding fabric. 

Well, I still have a little more of the fabric, enough for 2 wallets. Just go to my ETSY shop and grab it fast.


Until then,

Happy Sewing


Latest Video